Creating a Custom Level
For a custom level in HoloOcean, you must make a level using Unreal Engine. See the Unreal Engine documentation for more information on saving and creating a new level.
There are 2 main aspects to our HoloOcean levels: the landscape, and the water.
Landscape
For help creating your own landscape, please reference Unreal Engine’s landscape documentation. The documentation explains how to use the Landscape Mode within the editor, as well as how to apply and create materials for your landscape.
Note
As you create a landscape, please note that the water level is at z=0. The landscape must be below z=0 in order for our underwater agents to work as expected.
To aquire materials or assets for your landscape, you can purchase materials or find some free ones at Fab. Quixel offers many free assets and materials.
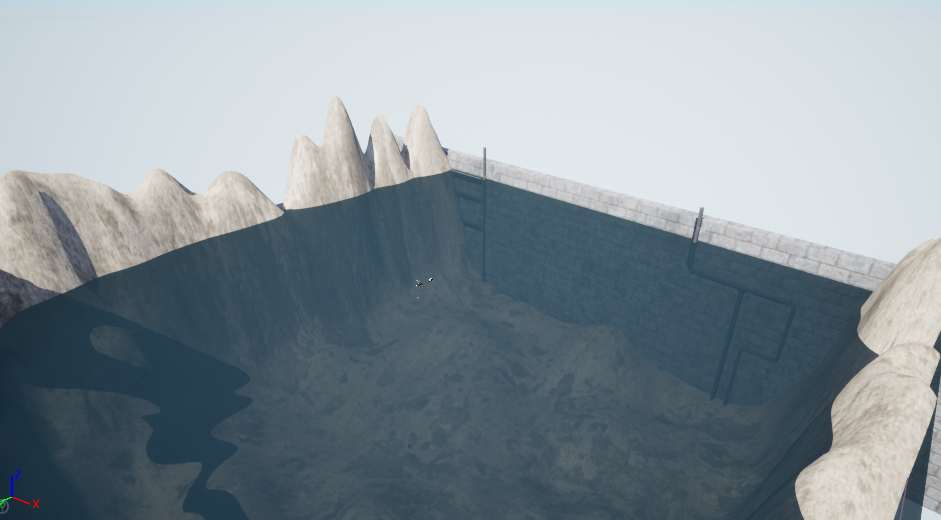
If you wish to enclose the sides of your environment, you can either place assets like walls or sculpt the edges of the landscape to be taller. Both examples can be seen in the SimpleUnderwater environment.
Water
The Unreal Engine Water plugin is not compatible with HoloOcean and will not work. Instead, to achieve an underwater appearance, you will need to place a water plane and one PostProcessVolume within your environment. Please note the following are suggested settings, and there may be others you would want to consider adjusting for your level.
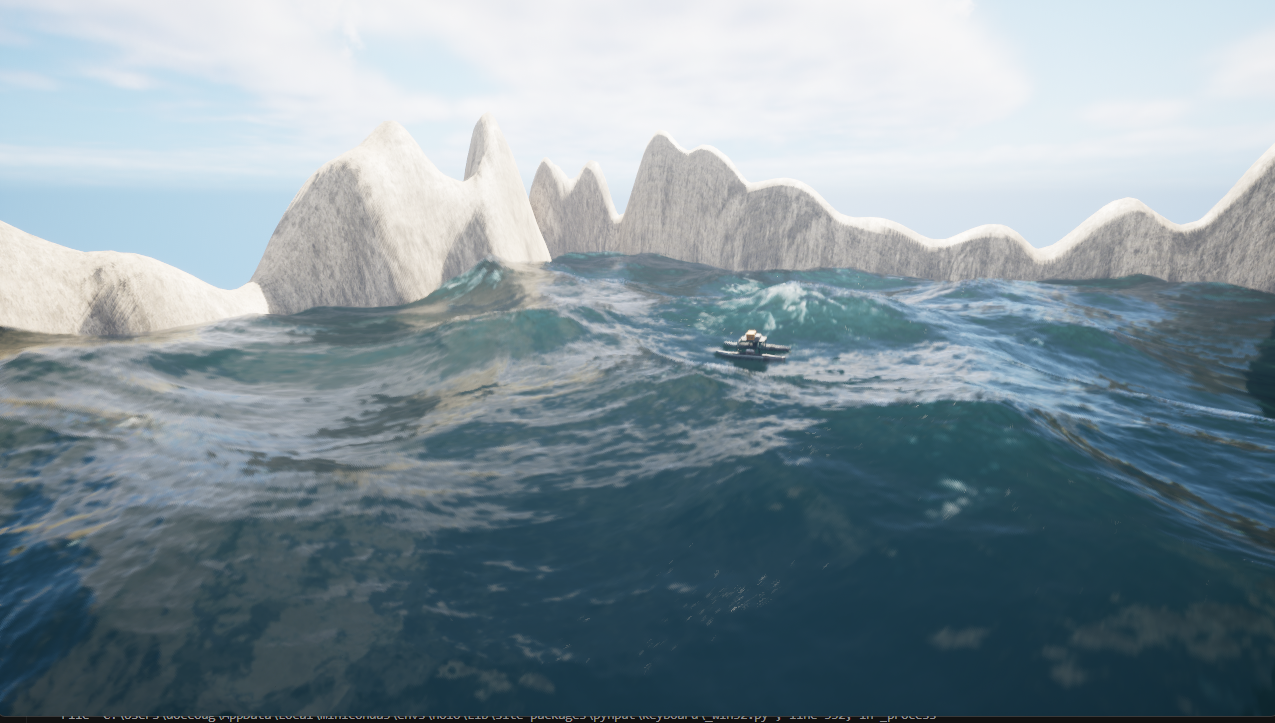
There are two different options for water planes, you can make a water plane with or without waves. If you are only doing underwater tests in your map, a plane may give you a better frame rate. If you are doing anything near or on the water surface, waves could enhance your simulation and aren’t too demanding.
Water Plane Without Waves
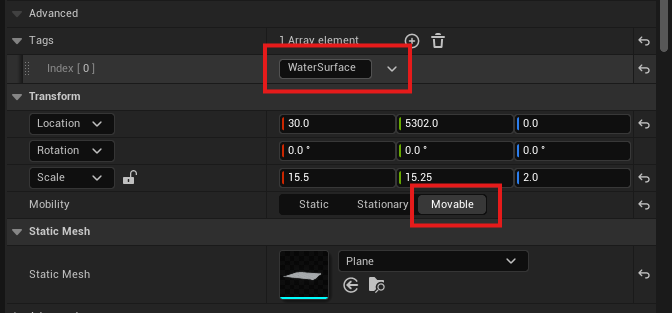
Place a plane actor at z=0 and size it to your needs. Set it to moveable so it works with tides, and in the actor tags label it WaterSurface.
Change the material to be any water-like material. If you do not have a material, we have a simple one that can be found at engine/Content/StarterContent/Materials.
Follow the collision settings found at Water Collision & Tagging.
If you want a water plane that is textured with the small FFT waves, then follow the steps in building a Water Plane With Waves, but create a default wind speed of 1 or 2 so you have ripples. When running the level leave fft_waves out of your config.
Water Plane With Waves
Place the mesh located in OceanWaterWave/Meshes into your world at z=0 and size it to your needs. Set it to moveable so it works with tides, and in the actor tags label it WaterSurface.
Place the FX_OceanWaves from OceanWaterWave/Effects into the level, it can be anywhere, tag this Wave.
Follow the collision settings found at Water Collision & Tagging.
If you want to include objects that can react to the waves in your levels such as bouys or boats then create a folder within your level titled “float” with subdirectories big_float and small_float. Then put any floating objects inside of one of those.

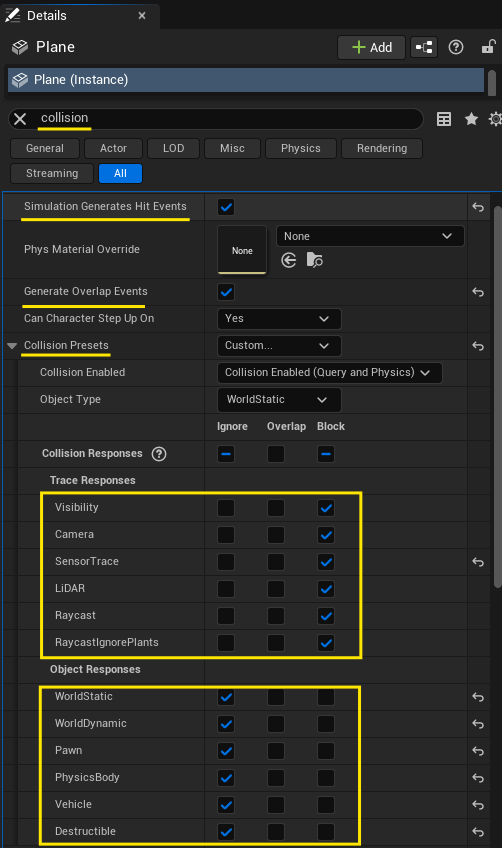
Water Collision & Tagging
Regardless of which method you chose for making your waves, please replicate the following collision settings on your plane so that the vehicles can pass through:
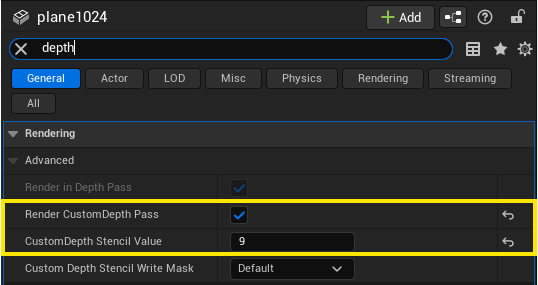
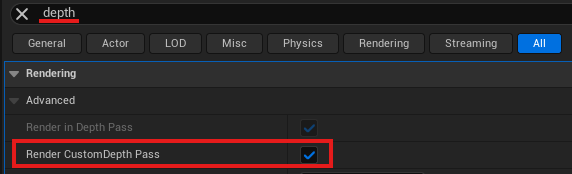
Please also enable “Render CustomDepth Pass” and set the “CustomDepth Stencil Value” to 9 as shown in the picture below:
Water Color (PostProcessVolume 1)
For the PostProcessVolume, go to Place Actors ➡ Volumes ➡ Post Process Volume and drag it into your level. Adjust the scale of the volume to fit your entire underwater area. To adjust the color of the volume, go to the Details pannel ➡ Color Grading ➡ Misc ➡ “Scene Color Tint”. Blue to green colors are best, and the Dam environment has the “Scene Color Tint” set to Hex sRGB AAD9C8FF.
As seen in the Dam environment, the water plane is a separate plane located at z=0. The red outline box that surrounds the environment is the PostProcessVolume.
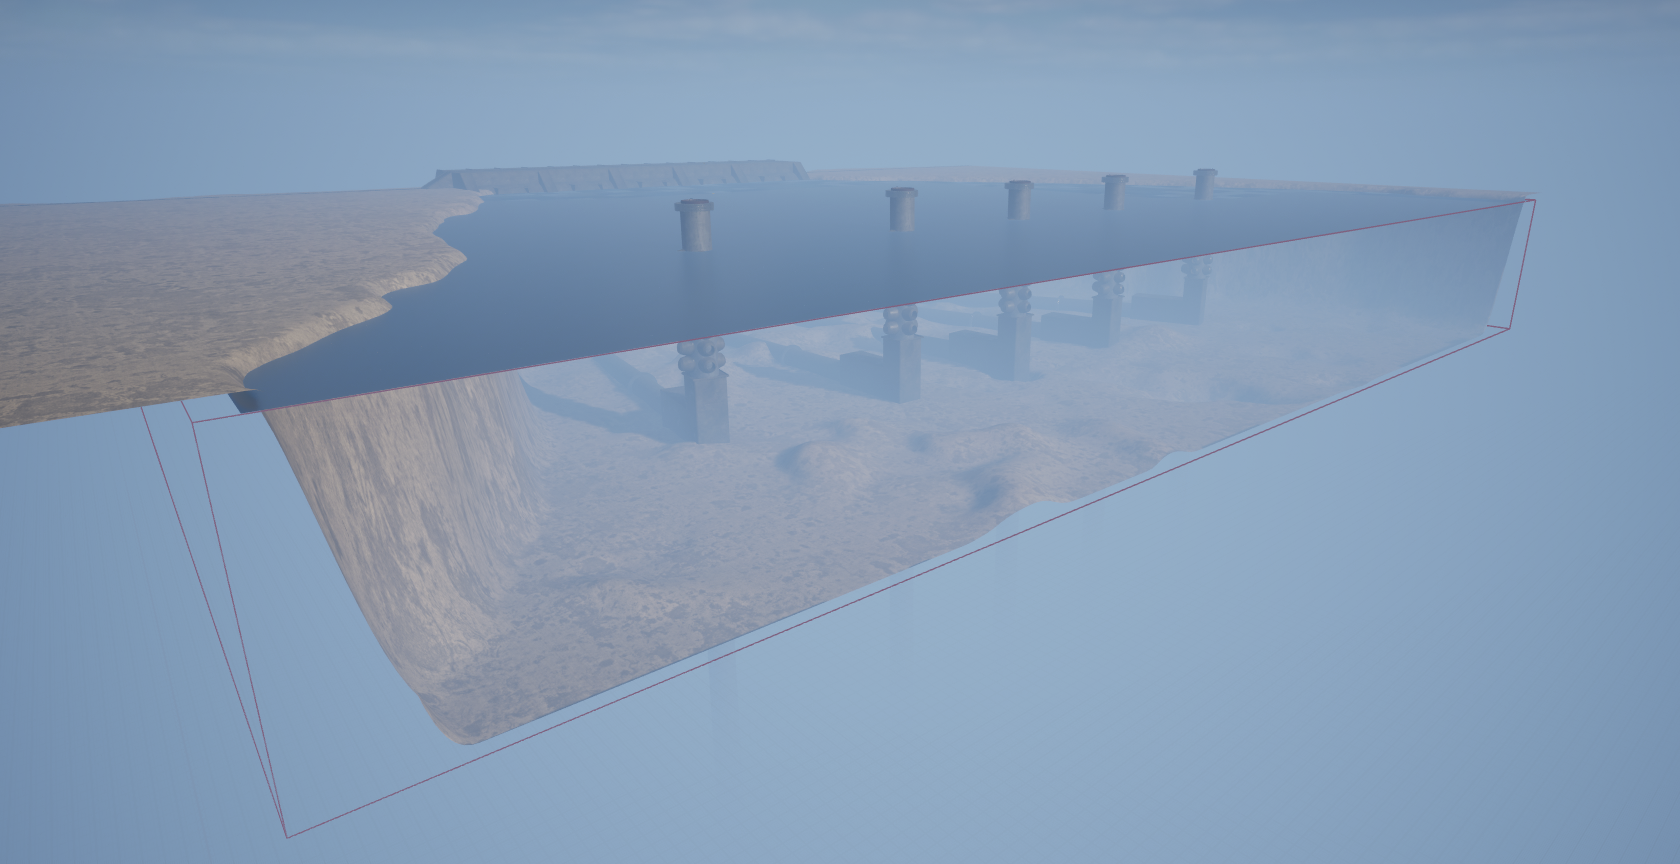
Make sure to tag the PostProcessVolume as WaterPPV so that the Water Fog Command and Tides Command function correctly.
Water Fog (PostProcessVolume 1)
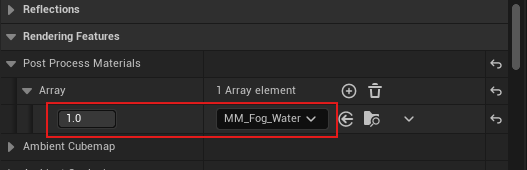
To simulate underwater fog and reduce visibility assign the MM_Fog_Water_Simple material to the same Post Process Volume that water color uses.
In the Details panel, navigate to Rendering Features ➡ Post Process Materials, add an element to the array, set it to Asset Reference, and select MM_Fog_Water_Simple.
Alternatively, you can drag the material directly from Content/WeatherContent/Fog/MM_Fog_Water_Simple.
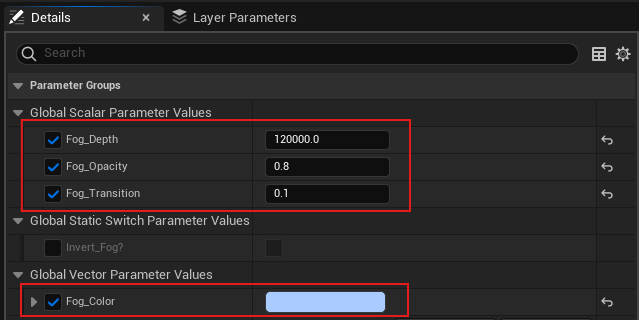
After applying the material, you can tune its parameters to achieve the desired underwater effect. The most relevant parameters are:
Fog_Depth – controls how far the fog extends.
Fog_Opacity – controls the density of the fog.
Fog_Color – defines the fog color (normalized RGB,
0.0 – 1.0).
Although the Fog_Transition parameter can also be modified, it is generally recommended to leave it at its default value of 0.1 and adjust the other parameters first. Modify it only if you need finer control over how the fog blends with the scene.
If desired, you can also perform the previous steps with a copy of the MM_Fog_Water_Simple material that you then modify to your needs and save to its own material name.
This keeps the original material’s settings intact for future use.
Lighting
If you created a Basic Level, the lighting should already be implemented automatically. Otherwise, go to Window ➡ Env. Light Mixer. From there, make sure to create all of the lighting options it gives you.
As a quick check, make sure your level has the following: DirectionalLight, ExponentialHeightFog, SkyAtmosphere, SkyLight, and VolumetricCloud.
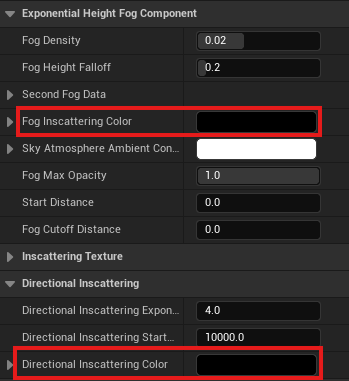
To make sure the Exponential Height Fog will work with our Day Cycle settings, set the “Fog Inscattering Color” and “Directional Inscattering Color” to black. The “Fog Density” and “Fog Height Falloff” can be adjusted until it fits your needs.
Adding Objects
Obtaining Assets
To populate your level with assets, you will either need to import your own assets or find assets on Fab.
To replicate similar levels as HoloOcean, we use the following asset packs:
Importing Assets
If you have purchased or obtained free assets from Fab, you can view them in the Epic Games Launcher under the Unreal Engine Library tab. Under the “Fab Library” section, you can click on “Add To Project” and select your project to add the assets.
If you are importing your own models, it is best to save them as FBX files. From there, you can click on the “Import” button from within the Unreal Engine editor and select your FBX file. Please reference Unreal Engine’s Documentation for further help with importing assets.
Placing Assets
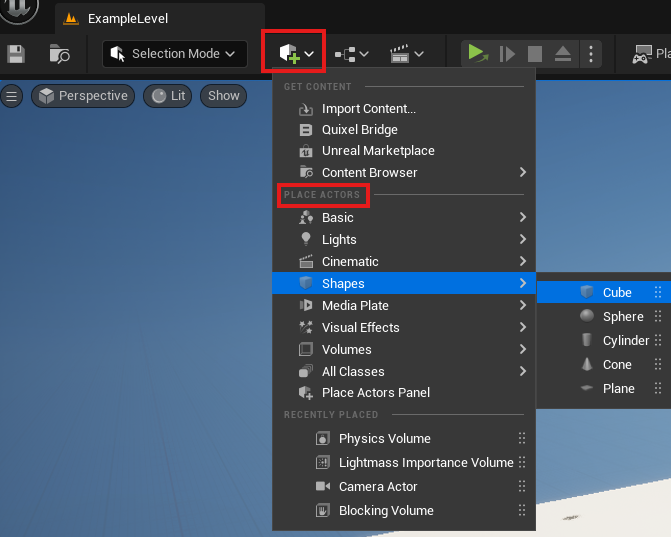
From the Content Drawer, you can drag and drop your assets into your custom level. Or, you can select the icon of the cube with the green plus symbol to quickly add actors such as basic shapes to your level.
It is simple to move, rotate, and scale objects within your level. You can either directly edit these values within the Details panel or use keyboard shortcuts.
Key |
Action |
|---|---|
W |
Selects the Move tool |
E |
Selects the Rotate tool |
R |
Selects the Scale tool |
For more information please reference Unreal Engine’s Documentation.
Enabling Semantic Labels
HoloOcean allows world assets to be assigned a label. Sensors such as the Semantic Segmentation Camera use these labels to return semantic information to the agent for tasks such as image segmentation.
To set up semantic labeling, please reference our tutorial here: Adding Custom Semantic Labels.
Enabling the Depth Camera
HoloOcean includes a Depth camera sensor that returns depth information to agents. To enable this sensor, you must change a setting in the environment and for each asset you wish to be detected by the depth camera. In the Details panel of the Unreal Editor, navigate to each asset you wish to be visible with the depth camera. For each asset, search “depth” and enable “Render CustomDepth Pass”. Do this for the landscape as well.
If you already set up your world for semantic labeling, you will have already done the steps necessary for the Depth Camera to work.
Note
Following the steps to set up semantic labels in your world will enable “Render CustomDepth Pass” for the assets that recieve semantic tags. Be sure to repeat the process above for all remaining assets in your world without semantic labels, including the landscape.
Collision Settings for Objects and Sonar
Both raycast and octree sonar implementations rely upon the collision mesh for objects.
First, if you are using our octree sonar implementation, make sure to set the environment boundaries to have the environment min and max. In standalone through Unreal Engine, this would be done by setting the Additional Launch Parameters as seen here: Launching Game Live. If you have packaged your worlds, this would be set in the config file.
Warning
Octrees must be regenerated for a level whenever an object is changed or moved. To regenerate the octrees, delete the octree folder and rerun your simulation. Please see Octree Generation for the octree location.
If the collision mesh of an object is coarser than the visual mesh then the representation of that object in a sonar image will be inaccurate. This issue can be addressed for the objects by using the Unreal Engine editor and setting the “Collision Complexity” option in the details section of the static mesh editor to “use complex collision as simple”.

Please note that even though you have “use complex collision as simple” enabled, it will still retain and use the simple collision mesh for physics simulation. To view both the simple and complex collision meshes, click on “Show” and enable either mesh type.

If you wish to remove the simple collision completely, click on the “Collision” tab and select “Remove Collision”. You can also edit the simple collision from this tab.

If you still have issues with your collision mesh, it is often helpful to enable “Double Sided Geometry” in the details panel of the static mesh editor.

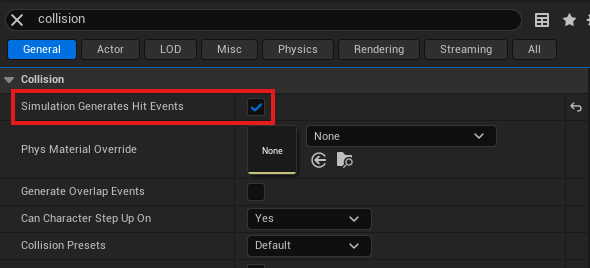
Finally, within the level, click on the object and go to the details panel. Go to the collision section and enable “Simulation Generates Hit Events”. The Default option for “Collision Presets” is correct and accounts for all our sonar implementations. If you want the object to be ignored by either the raycast or gpu sonar implementations you must do two things:
Select Ignore under “RaycastIgnorePlants”.
Make sure that the custom semantic label of the object is set to either 18 or 19, the labels for plants and corals. See, Adding Custom Semantic Labels.
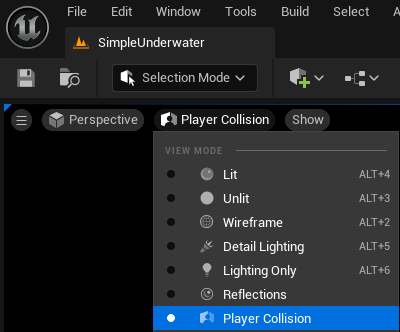
You can verify the shape of the collision mesh by changing the view mode to “Player Collision” in the level or in the static mesh editor.
Additional Tide Settings for Objects
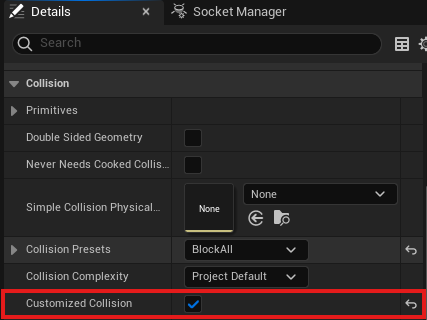
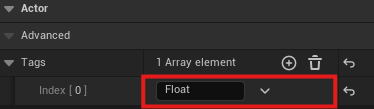
In order to create compatible non-agent floatables that with move with the tide you must add the keyword Float in the actor tags and then go into the collision settings of the static mesh and make sure that customized collisions is checked.
Weather
To add the weather feature to your custom level, you will first need to add the Weather Manager blueprint to your world. To do this, go to Content Browser ➡ Weather Content and drag BP_Weather_Manager into your level.
Next, you need to add two different Volumetric Cloud actors. Go to Place Actors ➡ Visual Effects ➡ Volumetric Cloud and drag it into your level twice.
After both actors are placed, assign a cloud material and tag each one:
Select the first Volumetric Cloud actor.
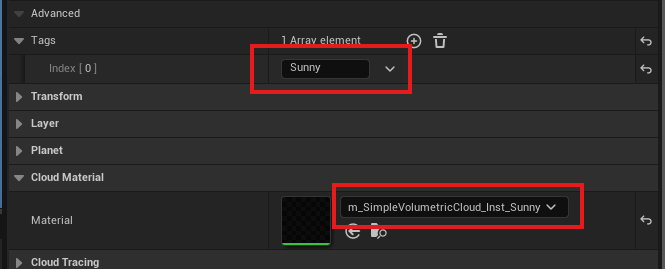
In the Details panel, under Cloud Material ➡ Material, assign the material m_SimpleVolumetricCloud_Inst_Sunny, found in the Weather Content folder. You can also drag the material directly from the folder into the material field.
Tag the actor by going to Actor ➡ Advanced ➡ Tags, click + to add an element, and name the tag Sunny.
Repeat the same process for the second Volumetric Cloud actor, but this time use the m_SimpleVolumetricCloud_Inst_Cloudy material and tag it as Cloudy.
Rain Ripples
After adding weather to your world you will already have rain effects, adding ripple effects is optional and requires additional steps.
First for your custom world you must create a new material instance of the ripple material. To do this, open the content browser and go to Content/FFT_OceanWaterWave/Materials.
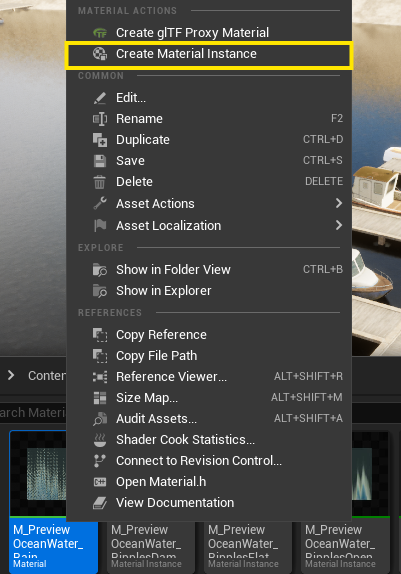
Once in this folder select the M_PreviewOceanWater_Rain and create a material instance of it, you can name this whatever you like.
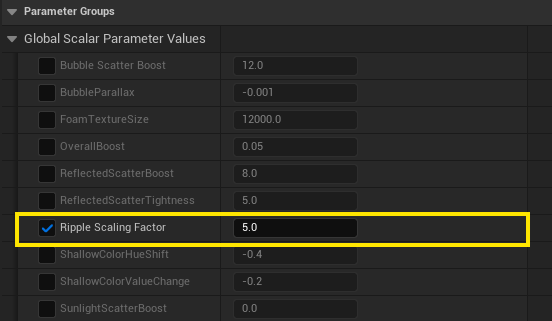
Go into the material instance and checkmark the ripple scaling factor, this changes the size of the ripples in your level. Depending on the size of your level a different value could work best for your needs. You may want to try out a few different values by replacing water plane’s material with your specfic ripple material. Look at the other ripple instances for a good baseline.
After you have finalized your material go to: holoocean/engine/Source/Holodeck/ClientCommands/Private/ChangeWeatherCommand.cpp. Once here find the else if (weather == 2) // Rainy option and add an
additional else if block containing your world name and fill the TEXT option with your material instance like the examples in code.
else if (WorldName.Contains("Custom World Name")) {
  UMaterialInterface* NewMaterial = LoadObject<
    UMaterialInterface>(
    nullptr,
    TEXT(
      "/Game/FFT_OceanWaterWave/Materials/M_PreviewOceanWater_Ripples<CUSTOM_WORLD_NAME>.M_PreviewOceanWater_Ripples<CUSTOM_WORLD_NAME>"));
  if (NewMaterial) {
    // Apply new material
    MeshComp->SetMaterial(0, NewMaterial);
  } else {
    UE_LOG(
      LogHolodeck, Warning, TEXT("New material not found"));
  }
}
Air Fog
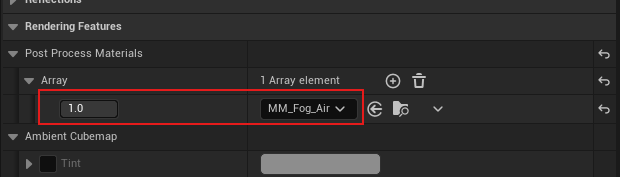
For above-water simulations where you want to introduce air fog or mist, you can add a PostProcessVolume that covers the desired region and assign it the MM_Fog_Air material.
In the Details panel, navigate to Rendering Features ➡ Post Process Materials, add an element to the array, set it to Asset Reference, and select MM_Fog_Air.
Alternatively, you can drag the material directly from Content/WeatherContent/Fog/MM_Fog_Air.
Once applied, you can adjust the material parameters to achieve the desired atmospheric effect. The most relevant parameters are:
Fog_Depth – controls how far the fog extends.
Fog_Opacity – controls the density of the fog.
Fog_Color – defines the fog color (normalized RGB,
0.0 – 1.0).
Although the Fog_Transition parameter can also be modified, it is generally recommended to leave it at its default value of 0.1 and adjust the other parameters first. Modify it only if you need finer control over how the fog blends with the scene.
Make sure to tag the PostProcessVolume as AirPPV so that the Air Fog Command and Tides Command function correctly.
Note on Flashlights
For vehicle flashlights to function properly, your level must include the FlashlightManager.
You can add it by dragging the manager from Content/HolodeckContent/Agents/FlashlightManager into your world.
The FlashlightManager does not alter the appearance or physics of the environment — it simply enables flashlight functionality.
Testing Your Custom Level
For quick testing of your level, it is often easiest to run in standalone mode. This will allow you to quickly verify collision settings or visuals without having to package the level. Please reference Launching Game Live to run your level from within the Unreal Engine Editor.
Otherwise, you will have to package your level after each change. Please reference Packaging Environments for information.