Getting Started
Note
The steps in this page are only necessary if you want to change HoloOcean’s C++ code or if you want to use Unreal Engine to develop new worlds. It is not necessary for making changes to the Python API or for using HoloOcean as a user.
Note
While developing for Unreal Engine is supported on both Linux and Windows, we have found the Unreal Engine development tools to be more stable and straightforward in Windows.
Developing in HoloOcean requires the following additional dependencies:
-
See UE documentation for setup
git
Python installation environment (we recommend conda)
numpy version >= 2.0.0
Note
HoloOcean 2.0 requires Numpy version 2. This is a breaking change from HoloOcean 1.0, which used numpy version 1. Please ensure you are using the version of numpy appropriate for the version of HoloOcean you are using.
Cloning
For running holoocean live, you’ll need to setup both the C++ and python portions of HoloOcean.
Clone holoocean.
Navigate into the local repository.
Checkout to the branch you want to develop on, likely the develop branch, which you can access through
git checkout develop,
Alternatively, create your own new branch for the feature or addition through
git checkout -b [your branch name] [the branch you want to branch off of]
You can now install the python package by running pip install -e client/ (or pip install .).
Make sure not to skip this step - reinstalling the package is necessary to apply the changes from
switching branches.
Opening & Prepping Project
To open the HoloOcean project in the Unreal Editor, find the holodeck.uproject file in the
holoocean/engine directory. Double-click this file, and choose “5.3” if an engine version dialog
opens up. Alternatively, open the Unreal Editor and select “Open Project” from the main menu.
Note
If you get a dialog that says “The project was built with a different version of the engine”, click “yes” to rebuild the project. This will take a few minutes, and you may get a few errors. If you do, click “yes” to all of them. This is a normal part of the process, and the project should open up.
In the Unreal Editor, go to Platforms -> <your operating system> -> Cook Content. After a few minutes you should get a success popup in the lower right.
Setting up VSCode
If you would like to use VSCode instead of Visual Studio for HoloOcean, you can do the following:
In Unreal Editor, Go to Edit -> Editor Preferences
Then go to General -> Source Code -> Source Code Editor and select Visual Studio Code
Once this is done you should now be able to generate a new Visual Studio Code project using File -> Generate Visual Studio Code Project
To open up Visual Studio Code go to File -> Open Visual Studio Code
Compiling
You need to recompile the project after making any changes to the C++ code.
Generally you can compile by clicking the “Compile” button in Unreal Editor at the bottom-right corner of the screen. It might be hidden if your screen isn’t wide enough. To ensure it compiles properly, click on the 3 vertical dots next to the compile button and make sure “Enable Live Coding” is turned off.

If you want to use Visual Studio to compile HoloOcean, you will need to generate the .sln file
by right clicking on the holodeck.uproject file within the engine folder, and then clicking on
“Generate Visual Studio Project Files”. If you are using Windows 11, after right clicking on the
uproject file, you will need to click “Show more options” in order to find the right option.
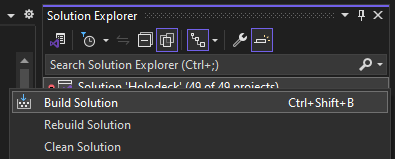
Double click the generated .sln file to open it within Visual Studio. From there, you can right click on the Solution on the right hand side of the screen and select “Build Solution”.
Launching Game Live
To avoid having to package the project anytime you want to see changes to your code, you can play the game live from Unreal Editor and then attached your python code to it. This is referred to as “running in standalone”. This is a multi-step process, as follows.
Note
If developing a sonar module, in UE5 click the 3 dots next to the “Play” button in the top toolbar, and click “Advanced Settings”. Add the following line to “Additional Launch Parameters”
-EnvMinX=-1000 -EnvMinY=-1000 -EnvMinZ=-1000 -EnvMaxX=1000 -EnvMaxY=1000 -EnvMinZ=1000 -OctreeMin=0.02 OctreeMax=5
These are all in meters. Tweak them as needed.
In addition, the -log parameter is useful for being able to close the game window easily, as well as for seeing log messages for debugging purposes.
Note
If you using the dynamics sensor, or expect certain tick per second rate, make sure to set -TicksPerSec=<val> as one of these arguments, so you get the simulation rate and behavior you expect. The -FramesPerSec=<val> command controls how fast it runs on your computer. See Frame Rates.
Open and prep a python script similar to the following:
import holoocean

config = {
      "name": "test",
      "world": "ExampleLevel",
      "main_agent": "auv0",
      "agents": [
            {
               "agent_name": "auv0",
               "agent_type": "HoveringAUV",
               "sensors": [
                  {
                        "sensor_type": "LocationSensor",
                  }
               ],
               "control_scheme": 0,
               "location": [0, 0, 1]
            }
      ]
   }

command = [0, 0, 0, 0, 0, 0, 0, 0]
with holoocean.make(scenario_cfg=config, start_world=False) as env:
   for _ in range(1000):
      state, reward = env.step(command)
Note that start_world=False is important. This tells the python script not to launch a new game
window. It will attach to the game window you launched in Unreal Editor.
Tweak the code above to put the sensors/agents you need in as you see fit.
Have some way to run this python file open and ready (for example. VS Code).
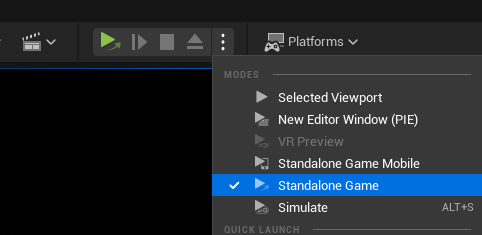
Back in Unreal Editor, click the arrow next to the “Play” button in the top toolbar, and select “Standalone Game”. A seperate window should pop open with the unreal game.
Once this window pops open, wait a few seconds for the game to fully load, then run your python script. It will attach to the new open Unreal game window and proceed as a normal HoloOcean simulation.
Note
If you close the Unreal game window before exiting the python script, your terminal will freeze and you’ll have to open a new one. One way to avoid this is to write a small .bat script that runs the python file. Alternatively, VSCode’s play button works rather smoothly as well for quickly opening/closing terminals with the correct conda environment.
Logging
Using Unreal’s log functionality is a simple way to debug code at runtime. Here is a good tutorial on sending things to the Unreal log.
This log will be saved in holoocean/engine/Saved/Logs if you want to see it later. To view the logs in the Unreal Editor, go to Window -> Output Log.
See Unreal’s documentation for more information on logging in Unreal Engine.